We did it! We found some great instructions online for uploading your own creations as backgrounds for blogs. We designed our own and uploaded it today. It was so much fun. You have to try it. Here are some instructions we hope you can follow:

How To Make Your Own Blog BackgroundYou will need to design your background using any photo editing software you are comfortable with. I used Adobe Illustrator for this example but you could also use Paint Shop, Microsoft Publisher, MS PowerPoint, Adobe Photoshop, etc. If you don’t already use any of these you can go to
http://www.paint.net/ and download a cool (and FREE) program to design with.
Start with a new screen using the same sizes as shown: 
Next, open up all of the elements that you plan to use with your background. There are lots of scrapbooking websites that offer free digital graphics you can use. A good place to start is
www.digiscrapdepot.com. Please follow all copyright laws and instructions on the sites to make certain it is a design you can use.
These are the elements I will be using for my blog background: 
Next you need to put all of the basic elements onto your background. Be sure to keep the follow measurements in mind. You need to stretch and pull to make everything look just right.
This is my background. Please note:
 If you are creating a 3 column background, you will want to make the center column at least 9 inches (or more) wide.
Uploading Your Background: 
You must have an account with
http://www.photobucket.com/ to do this next step. After logging in to your Photo Bucket account, please go to your image gallery. You'll see the following box. You can upload your background. Make certain to chose reduce your image area to say
1 megabyte. This makes sure your background stretches to the length of your screen. I actually have a premimum account with them and purchased the 2 megabytes but think the 1 megabyte would have been fine. After you have finished uploading your background, you'll find it down with your other images. Now copy and past the
Direct Link (see below).
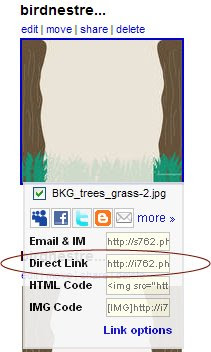
With your image copied, you will need to follow these specific instructions as to how to apply it to your blog:
*Log in to your blog.
*Next go to customize, layout‚ then pick a new template‚ and choose the minima template.
*Then click on
edit HTML to change a small portioin of your code. Scroll down and look for this text:
body {background:$bgcolor;margin:0; color:$textcolor; font:x-small Georgia Serif; font-size/* */:/**/small; font-size: /**/small; text-align: center;Change that part of the code to say this:
body {background:$bgcolor;background-image:url(direct link goes here);background-position: center; background-repeat:no-repeat; background-attachment: fixed;margin:0; color:$textcolor; font:x-small Georgia Serif; font-size/* */:/**/small; font-size: /**/small; text-align: center;Now, use the
direct link from your photobucket image and insert it between the parentheses where is says "direct link goes here" and click preview. If it looks correct you can now click SAVE because you are finished!

 Create delicious custom cocktails and hors d’oeuvres by plunging flavor into pitted olives using the OlivatorTM. This unique gadget cores the perfect size and shape of pimento, onion, jalapeño, garlic or semi-firm cheese and then delivers it into the pitted olive with a simple press of the button. Take the OlivatorTM beyond the bar and plunge chocolate or mascarpone cheese into cherries or strawberries, or add tangy goat cheese or chipotle into pitted figs for tasty dessert or appetizer creations. Be creative with your culinary combinations! The OlivatorTM is durably constructed of stainless steel with a soft, padded grip and is dishwasher safe. Care and use instructions included. Please Note: the OlivatorTM is not designed for pitting olives.


